


Audio Equipment
Best laptop for music production [2022 Edition]
May 3, 2025
Laptops are so powerful these days that you can produce radio-ready tracks almost anywhere. But there are a few things to consider before yo...
If you are starting out with video editing, knowing how to use Adobe Premiere Pro can be the difference between producing an amateur video and a professional one. Our introductory guide will help you take the first steps and provide you with the tools you need to make your production shine!
It seems almost everyone these days is posting video content online. Whether it’s a daily vlog or your band’s latest music video, it’s important to stand out. If you don’t give viewers a reason to choose your video over thousands of others then no one will watch it.
Videos can go viral for many reasons, the right content at the perfect time or seemingly even pot luck.
But, when you look at creators who consistently get great results it isn’t by accident.
It’s because their content is engaging and well produced…and they know how to use Adobe Premiere Pro.
So, before you make plans to join the elite of video-makers, let’s start with the basics.
Adobe Premiere Pro is one of the industry standards in video editing.
Movie studios and YouTubers alike use Premiere Pro every day to make their videos look great.
We are taking a look at how to use Adobe Premiere Pro. In our beginner’s guide we will walk you through the basics.
IMPORTANT: If your content isn’t good, no amount of editing will change that. Make sure you are on the right path before you start editing.
It’s pretty straight forward to get a new project started but it’s best to look at it step by step.
First things first, launch Adobe Premiere Pro and you will see a window like the one below.
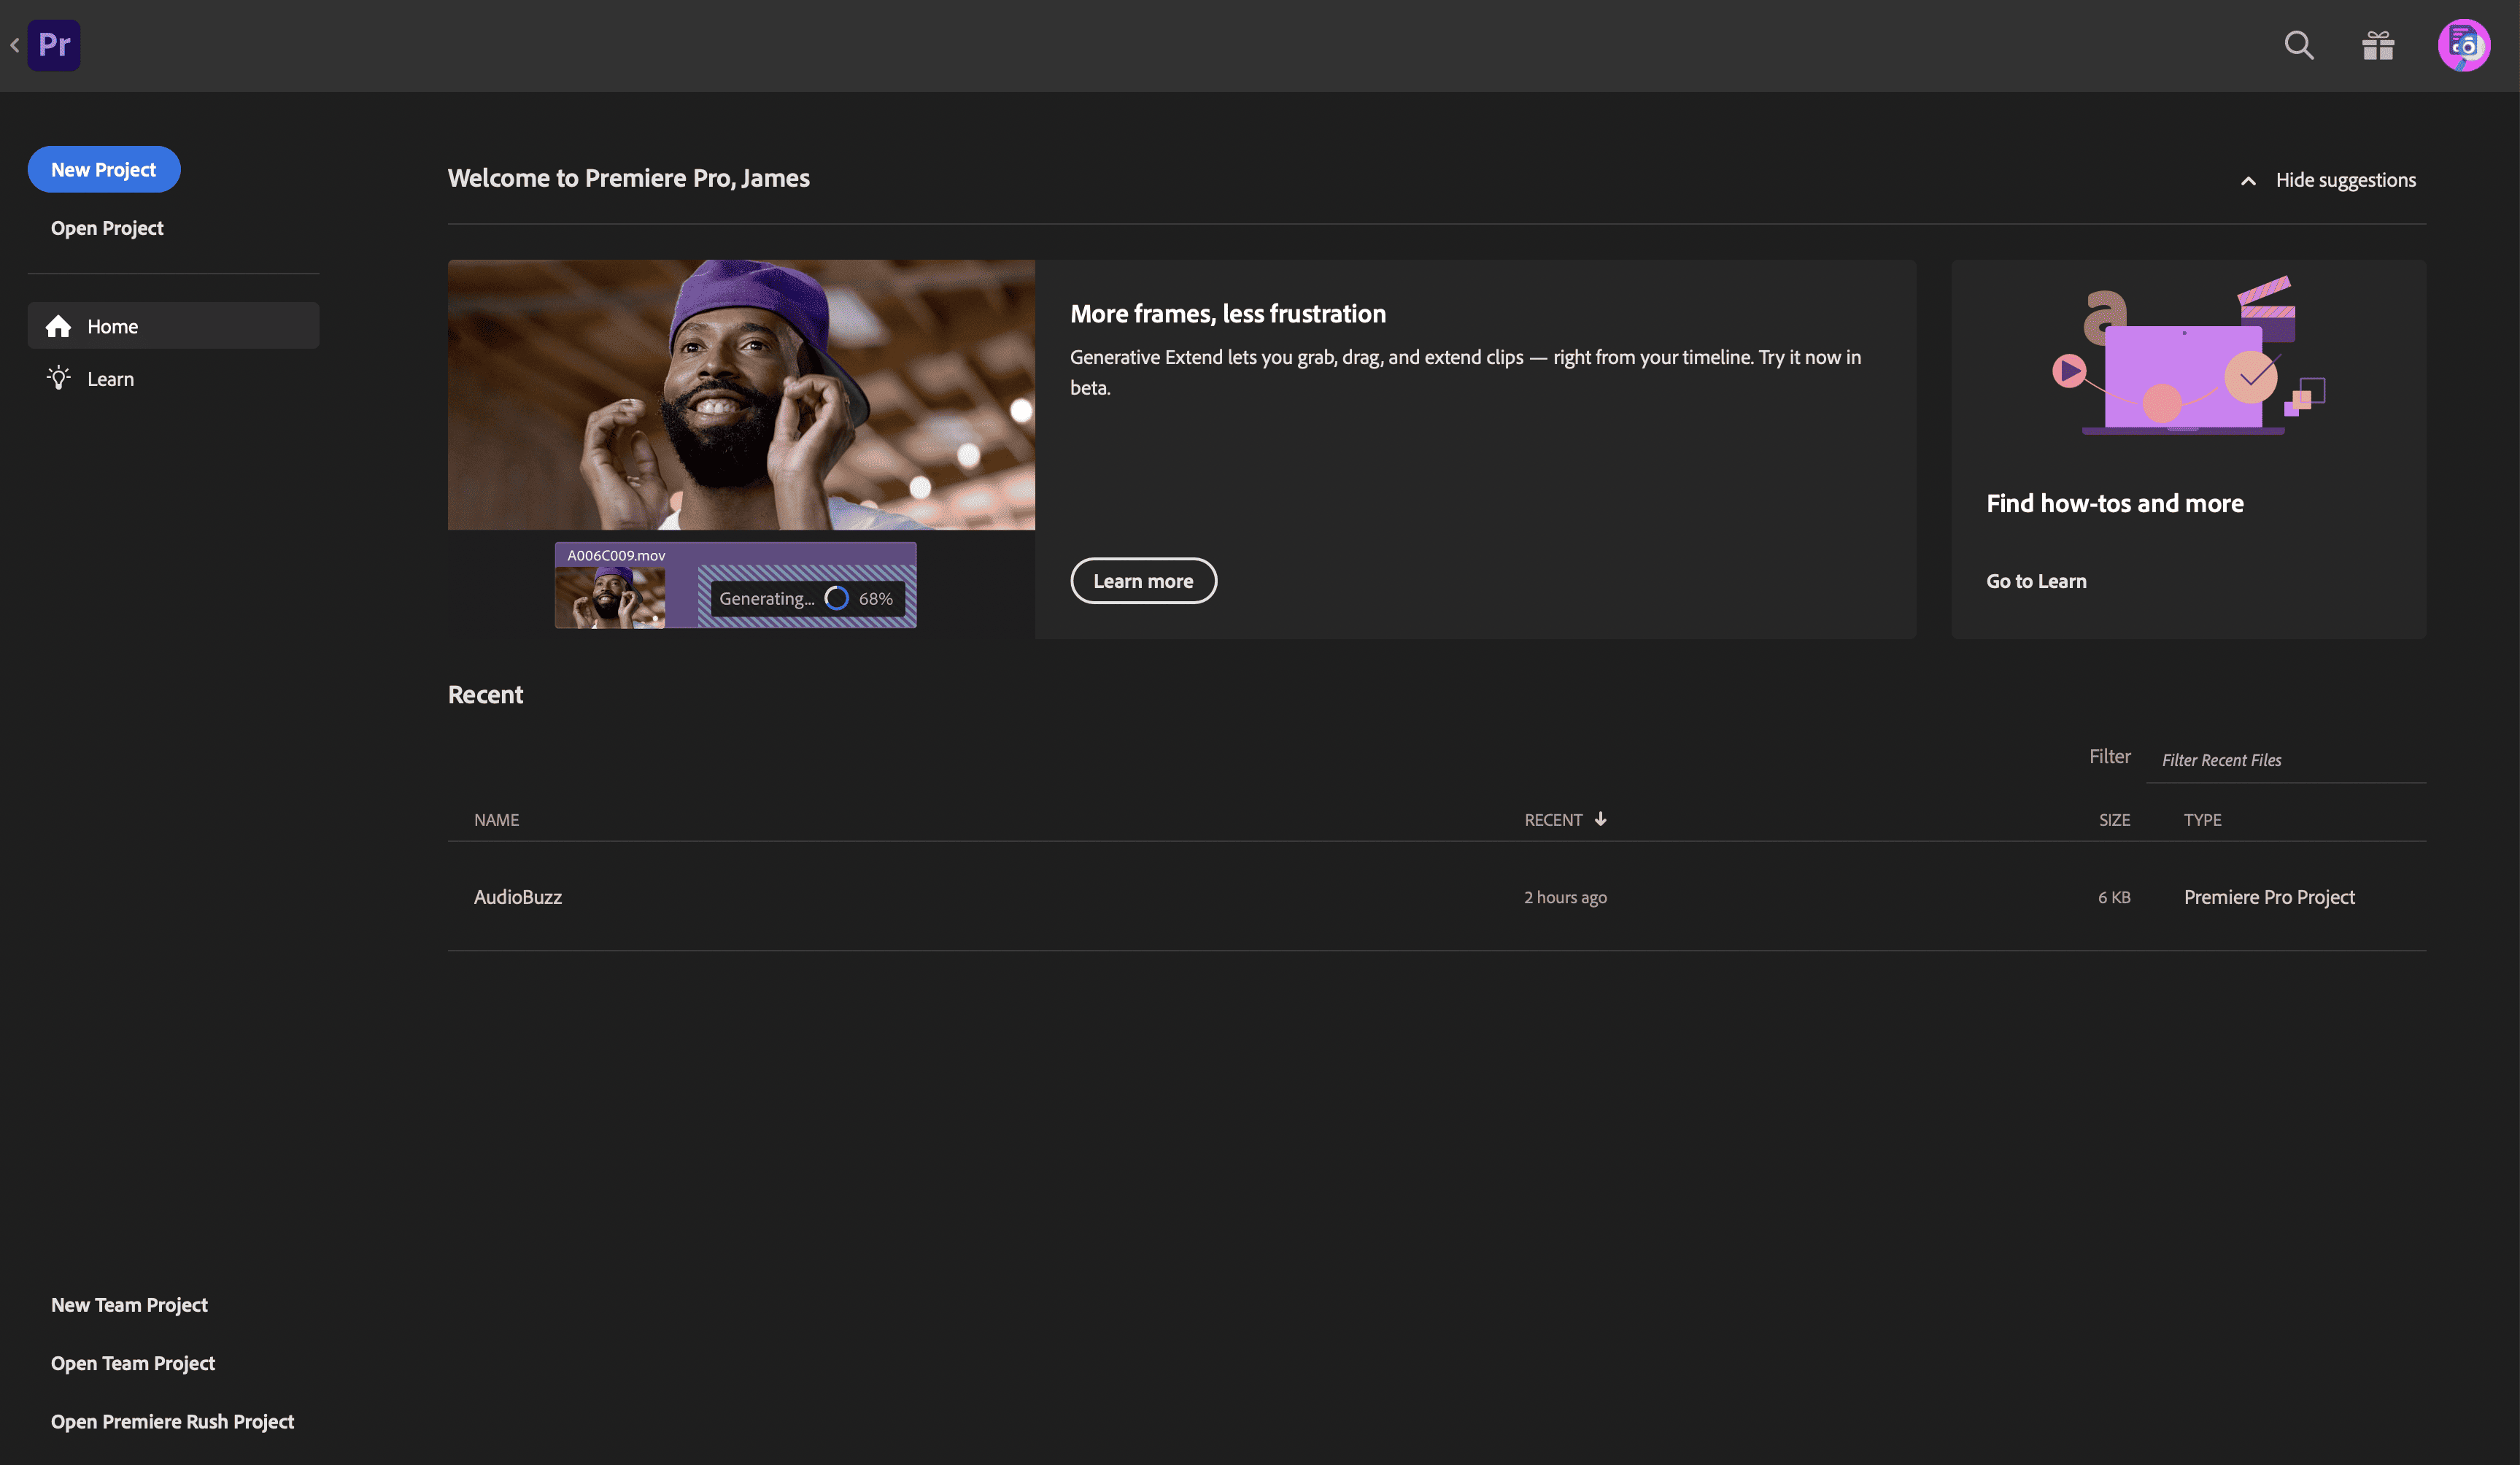
Once you have clicked on new project, you can name it, and select a save location.
Make sure you name your project something that will make it easily identifiable, for example, ours is named “Audiobuzz”.
It sounds like an obvious thing to say but many video editors end up with folders full of projects like “New Project 1”, “New project 2” and so on.
If you get into that bad habit you will spend more time looking for the right project than you will do editing it.
You also have to set a suitable save location; create a clearly named folder for your project before you start.
Once you’ve named your project and set your save location, the following screen will prompt you to add some media.
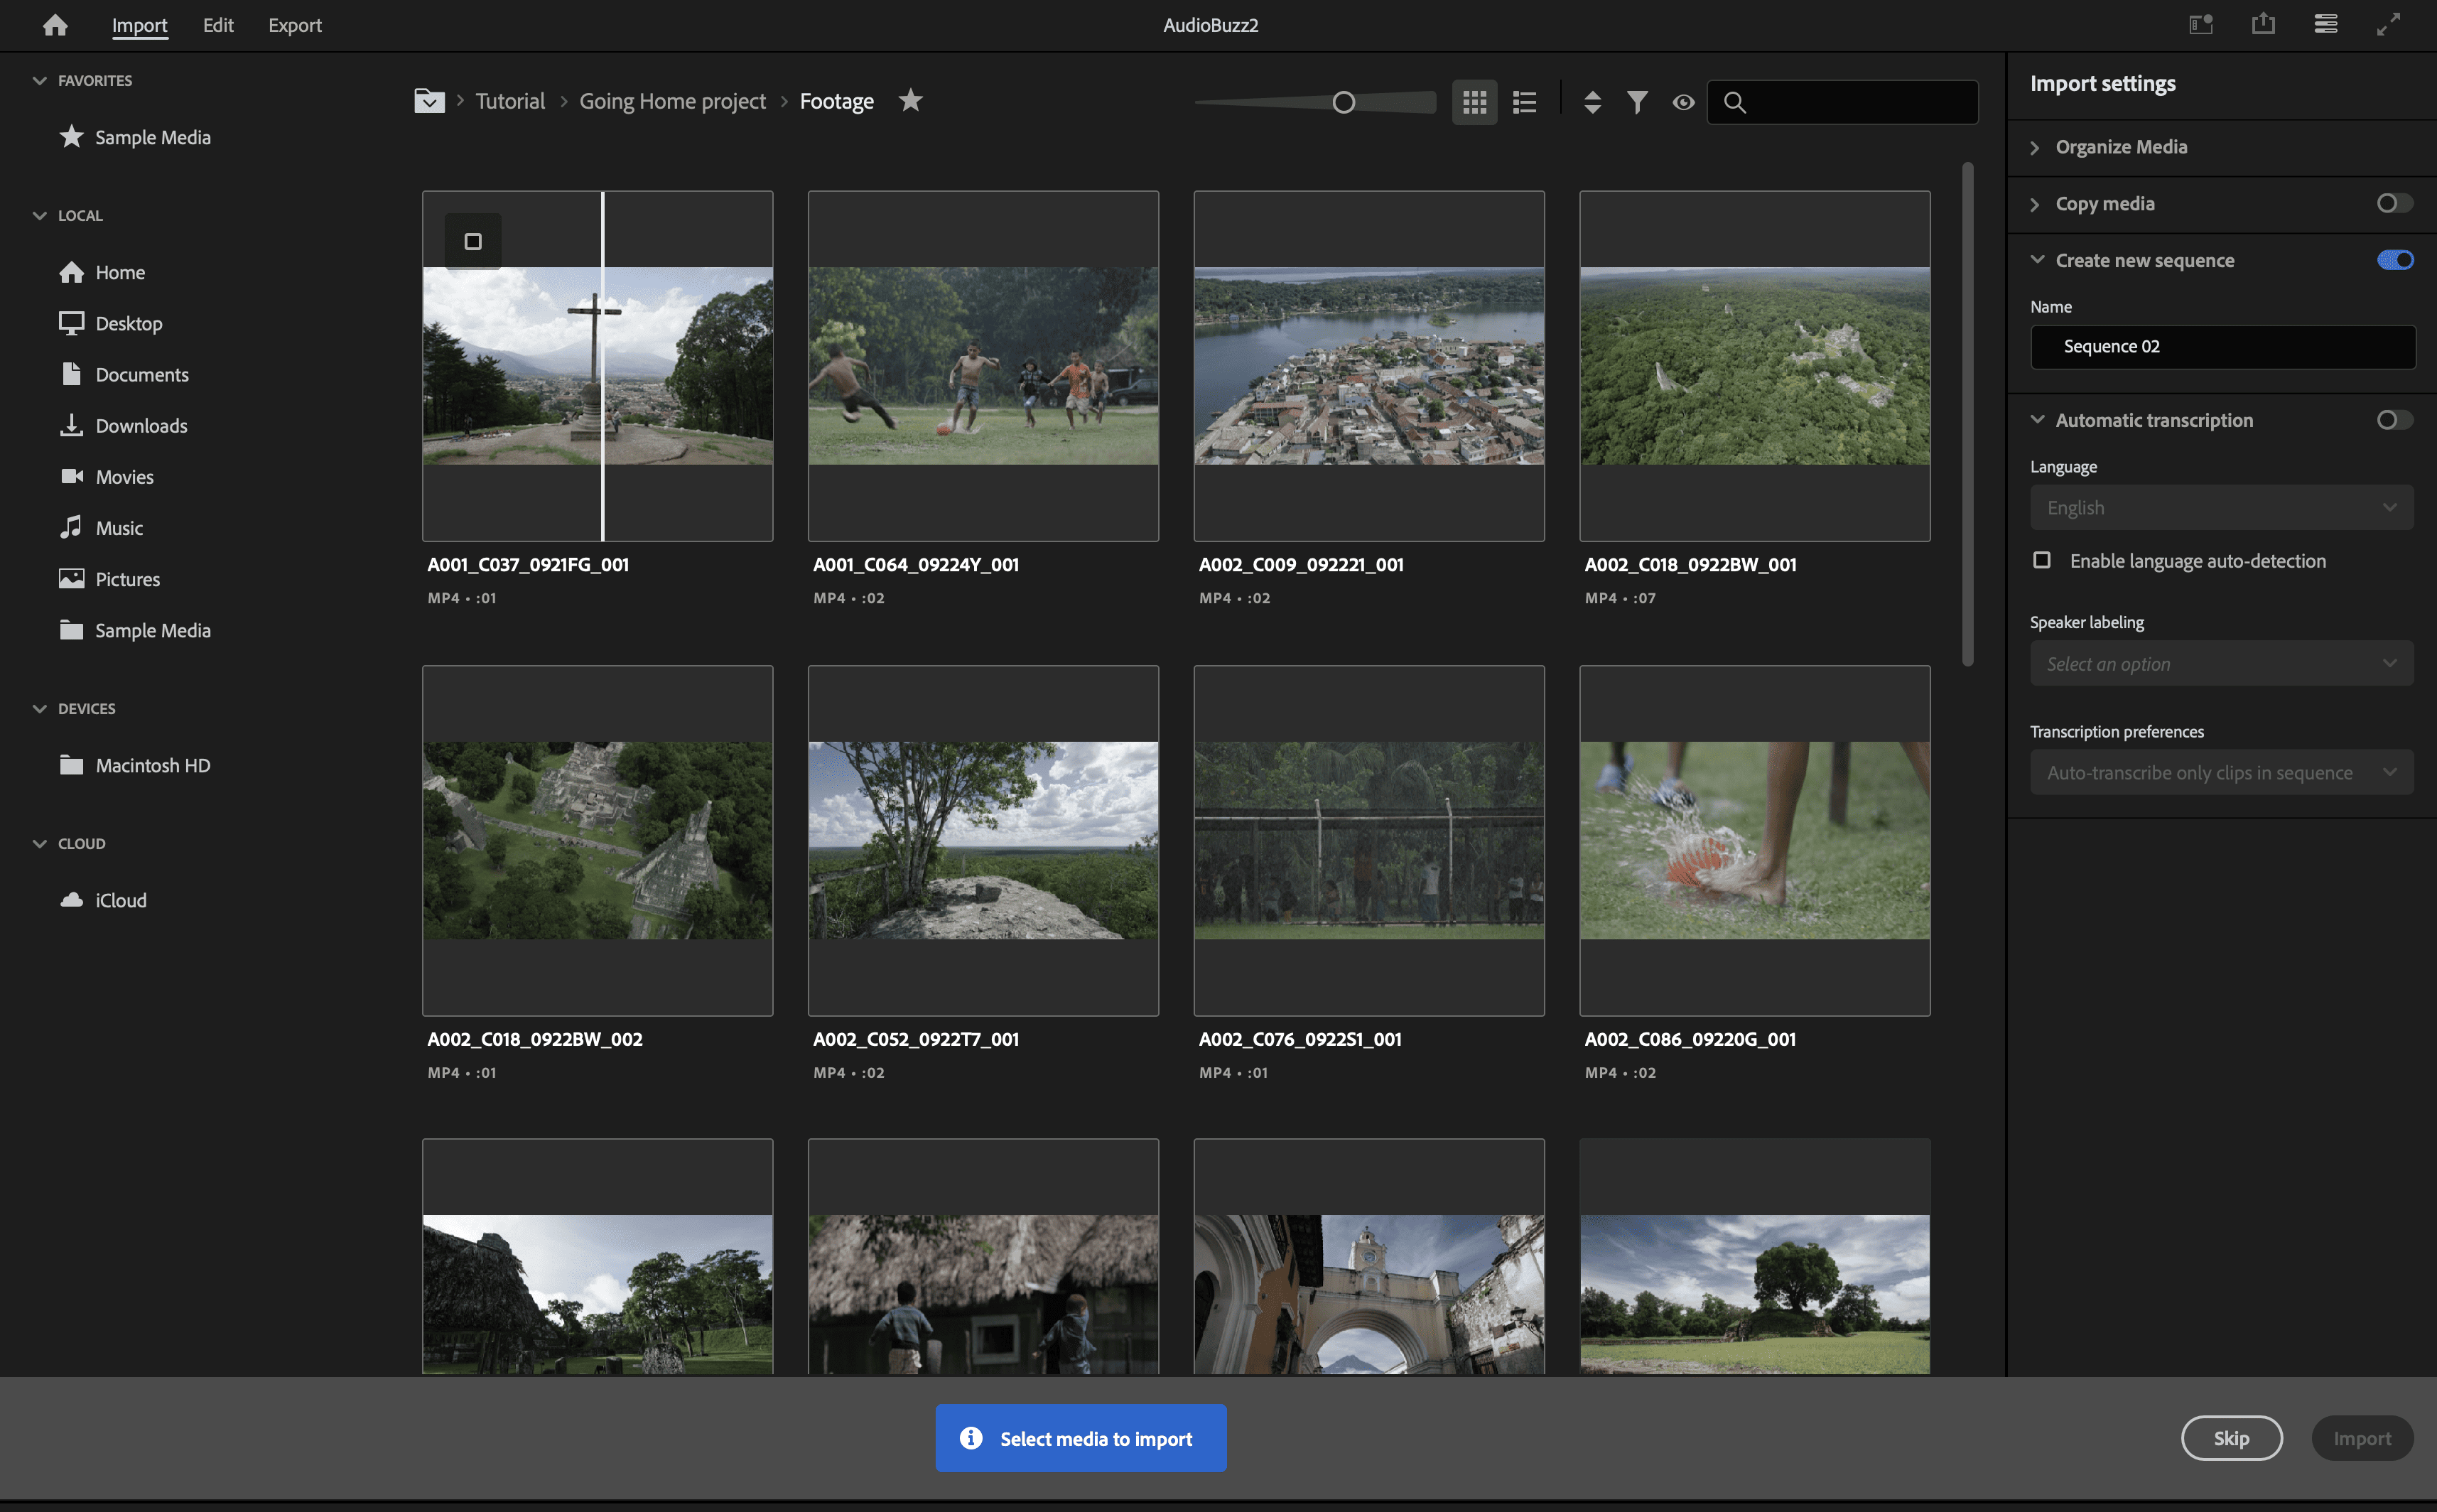
As you can see, you can browse media on your device by type (movies, music, pictures) or select from Adobe’s stock media.
When working with video, you discover just how quickly disk space can be eaten up.
It’s a good idea to have an external drive that you keep for your projects to save cluttering your computers hard disk.
This will also avoid decreasing the performance of your Mac or PC.
The Premiere Pro interface gets a few complaints for not being as user-friendly as some alternates, and to be fair, it’s not.
But, in Adobe’s defense, Premiere Pro does more than the rest, so it’s no surprise that the learning curve is a little steeper than most.
There’s good news; first of all, the interface isn’t nearly as bad as some people say, and second, the latest updates have made significant improvements.
You won’t learn everything in one day, but you can start editing immediately by understanding just a few main panels.
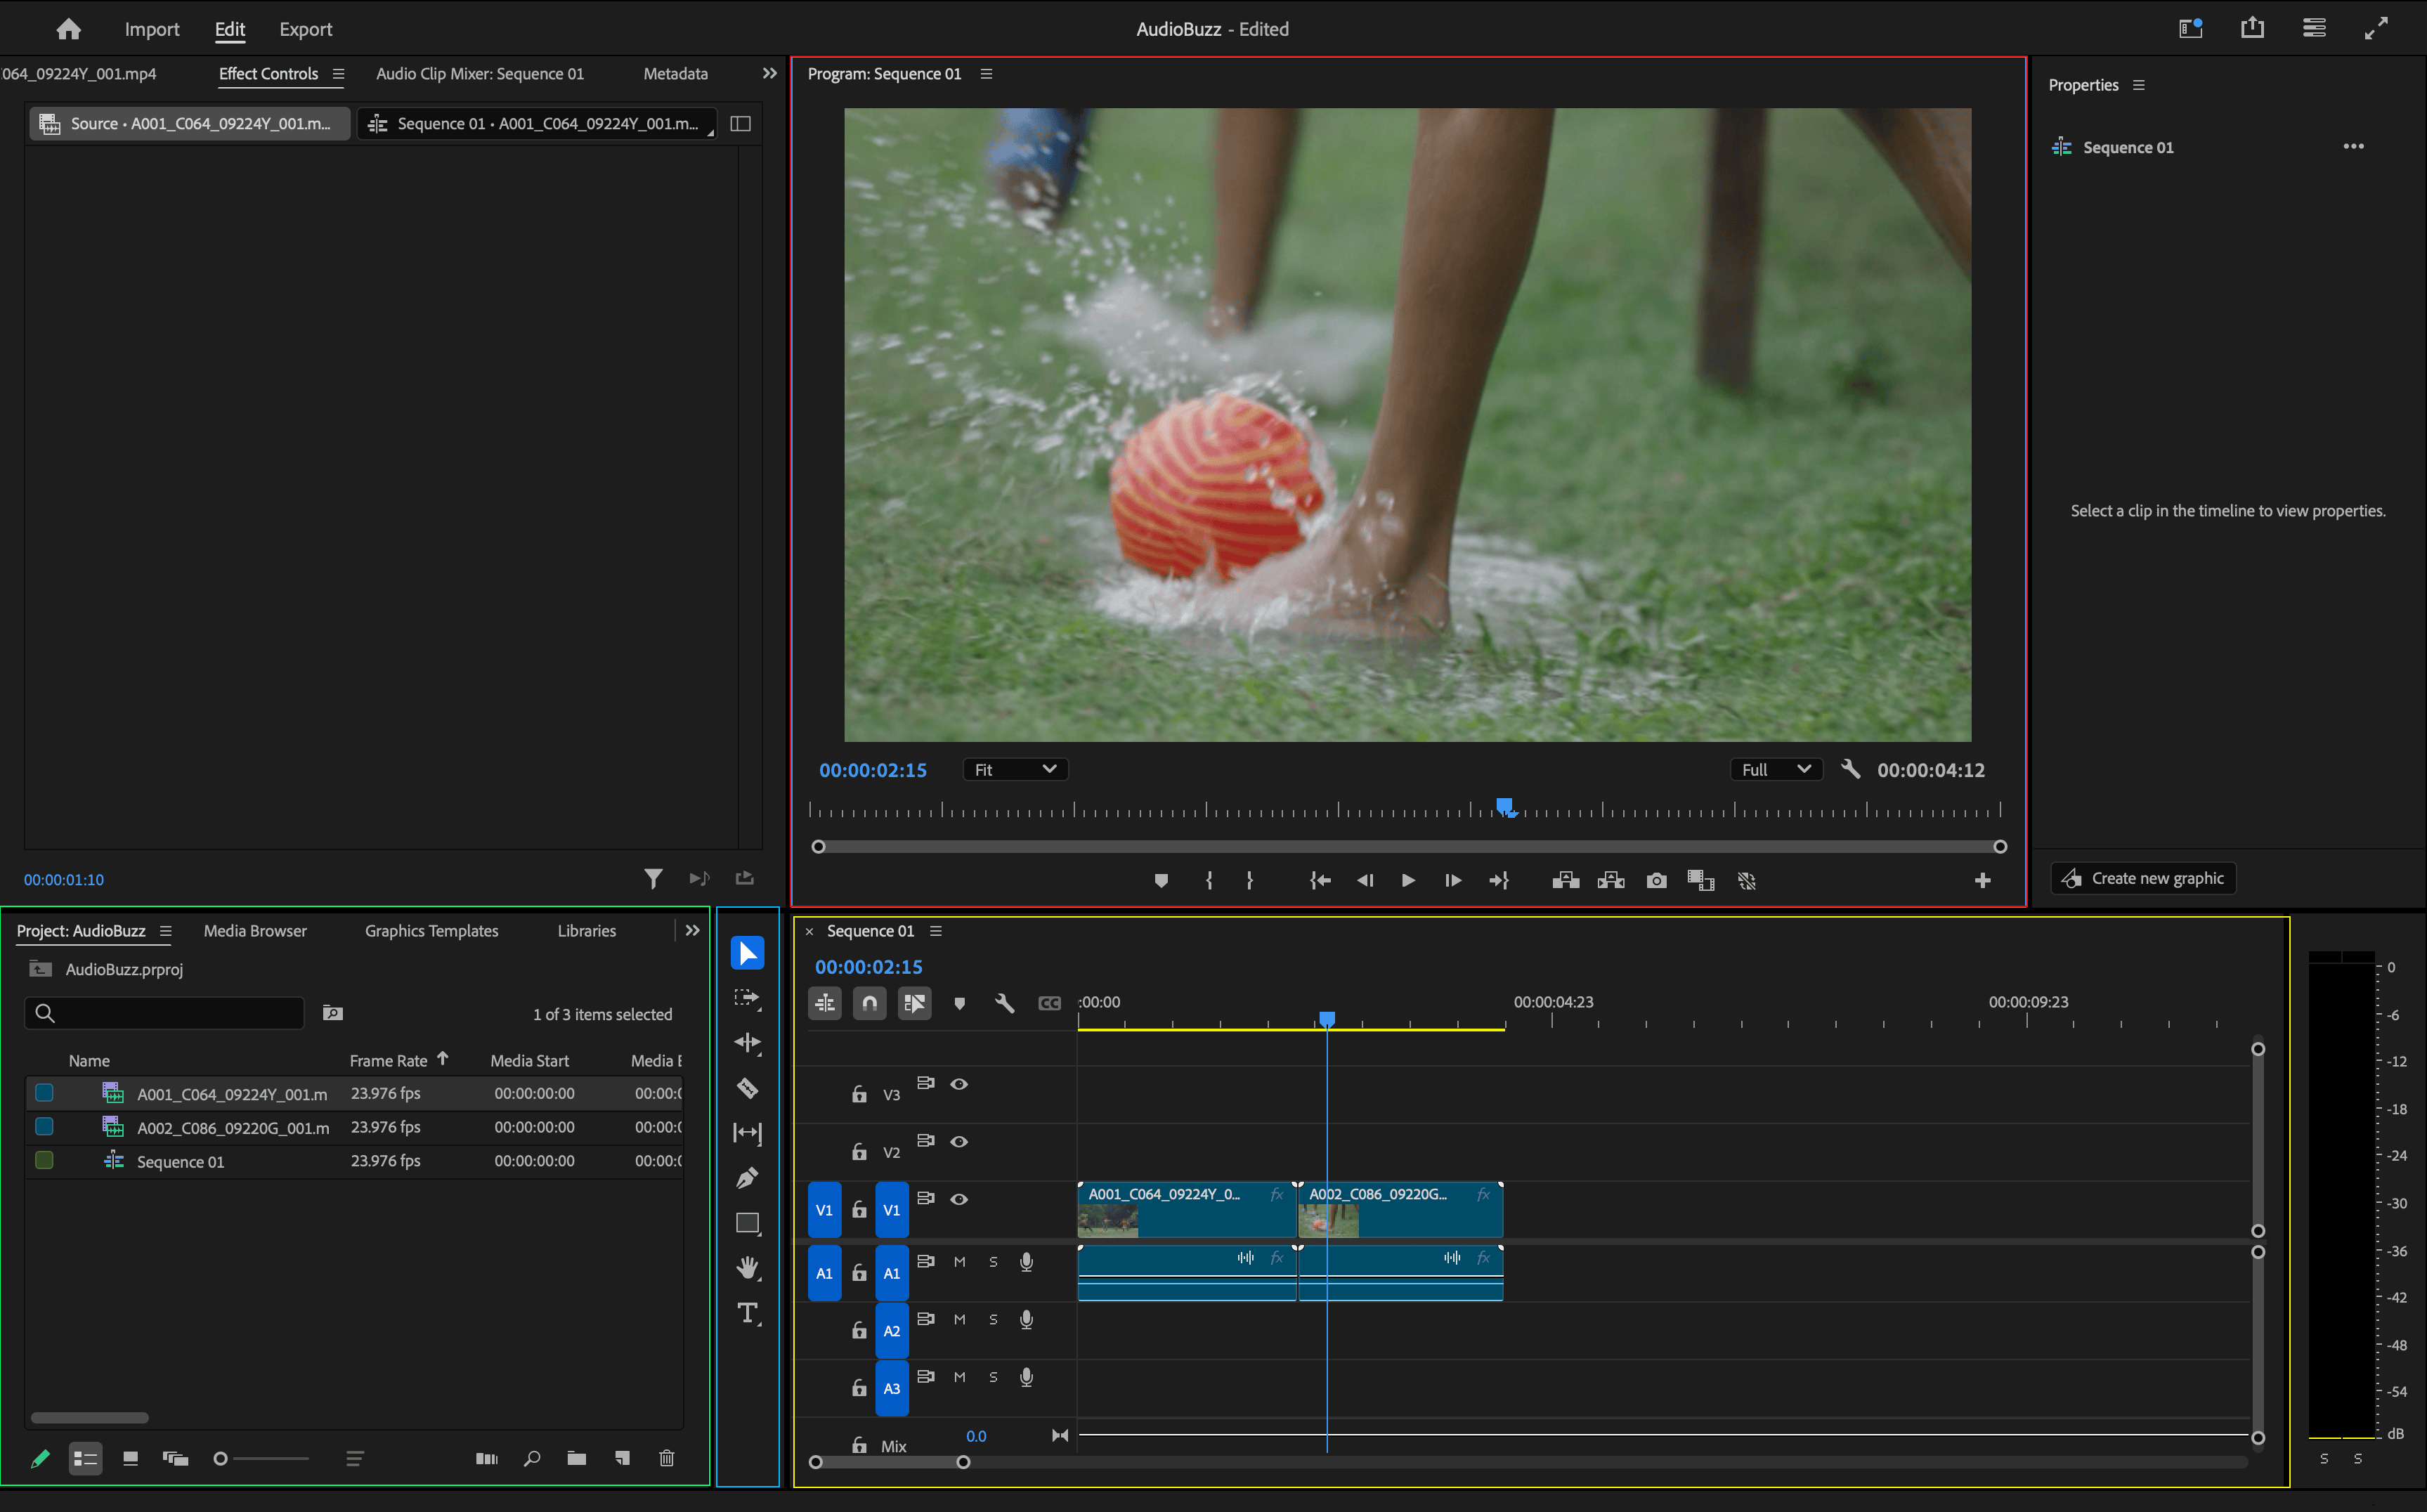
You can see the most important panels highlighted in different colours in the image above.
The Project Panel (green) is where all your media is stored; all movies, images, and audio files added to the current project will appear here.
The Source/Program Monitor (pink) is where you can see your video as you edit, and preview or trim clips before adding them to the timeline.
The Timeline (yellow) is where you arrange your media to form one continuous movie.
The timeline features video tracks and audio tracks; video tracks appear at the top, and audio tracks at the bottom.
You can overlap different video and audio track.
The Tool Panel (blue) is where you’ll find the most commonly-used tools, like the selection tool and razor tool (for cutting clips).
The interface will change depending on the Workspace you’re using; Editing is the standard, but you can choose from many templates via the Workspaces menu (click the icon as shown in the image below).
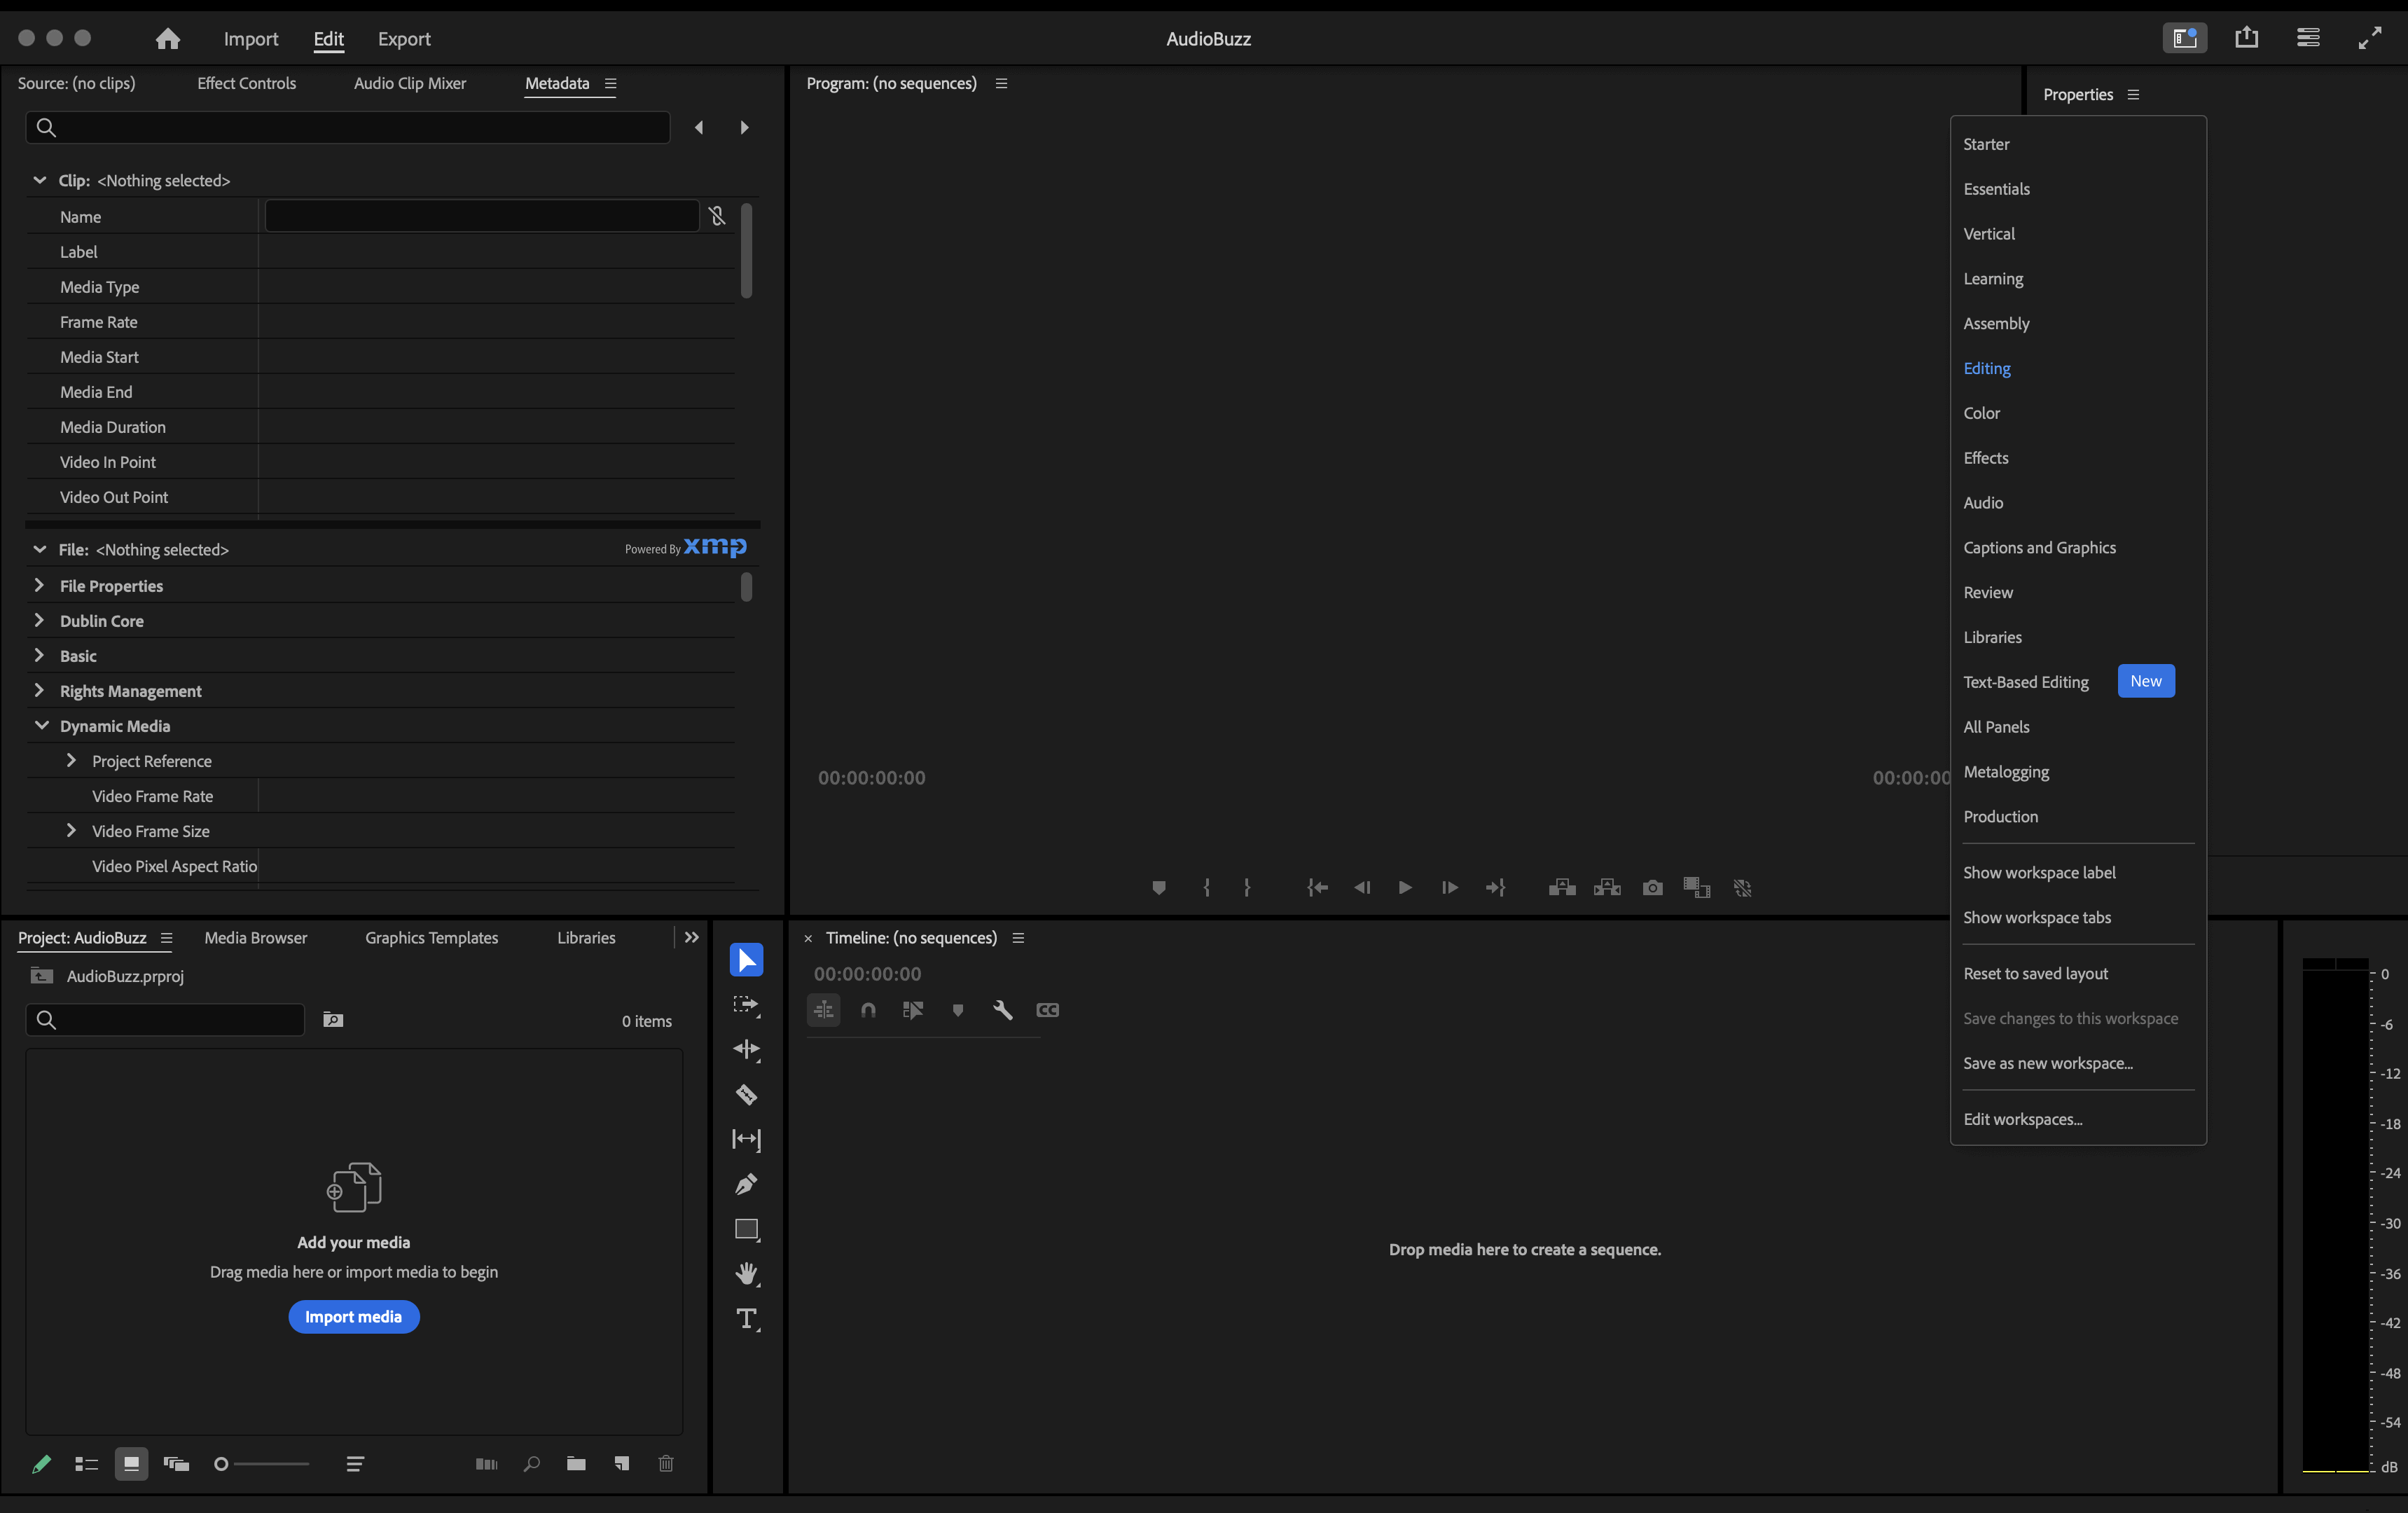
The learning layout will add a sidebar with some useful tutorials for beginners.
Once you choose a workspace, you can customise it by moving or resizing panels.
When you are comfortable with the workspace it’s time to get started by importing your media.
A good habit to pick up early is arranging your media before importing.
So, if you have multiple files you should create folders for each type, video, audio, images and so on.
If you do this, you can select all of your folders and drag & drop them into your project panel.
This way they maintain the same order and stay in their original folders giving you a nice, clean, easy-to-use workspace.
You can also use the Media Browser panel; to view this panel, click Media Browser in your Project panel.
First things first, what is a sequence?.
A sequence is a single video within your project comprised of one or more imported media sources.
Basically, it’s a video. It’s putting your media together to create one continuous video.
A project can have multiple sequences, but for now, we will deal with creating just one.
The easiest way to add media to a sequence is to drag it from the program panel to the new item button below.

The reason for doing this rather than dragging straight to the timeline panel is that this way will automatically match your sequence settings to your selected media.
It’s not uncommon to be adding media from more than one source which often means different resolution formats.
If this is the case, make sure to upload the media with the resolution format you’d like your sequence to match to first.
Before you add media to your timeline it’s a good idea to have a look at it and make sure there are no issues.
To do this just double-click the clip you want to preview and it will appear in your source monitor above.
The source monitor isn’t just for previewing media, you can also make minor edits.
If you have a 60-second clip and you only want to use the middle 40 seconds you can trim it here.
It’s a good idea to get used to using your source monitor this way as it limits the chances of missing things later in your timeline.
To select only the middle 40 seconds you have to add IN and OUT markers.
Scroll to the 10 second point of your clip and hit the “I” key, this will add your IN marker.
Now scroll to the 50-second mark and hit the “O” key, this will set your OUT marker.
When you add the clip to your sequence now it will start and end at those points, showing only the selected section.
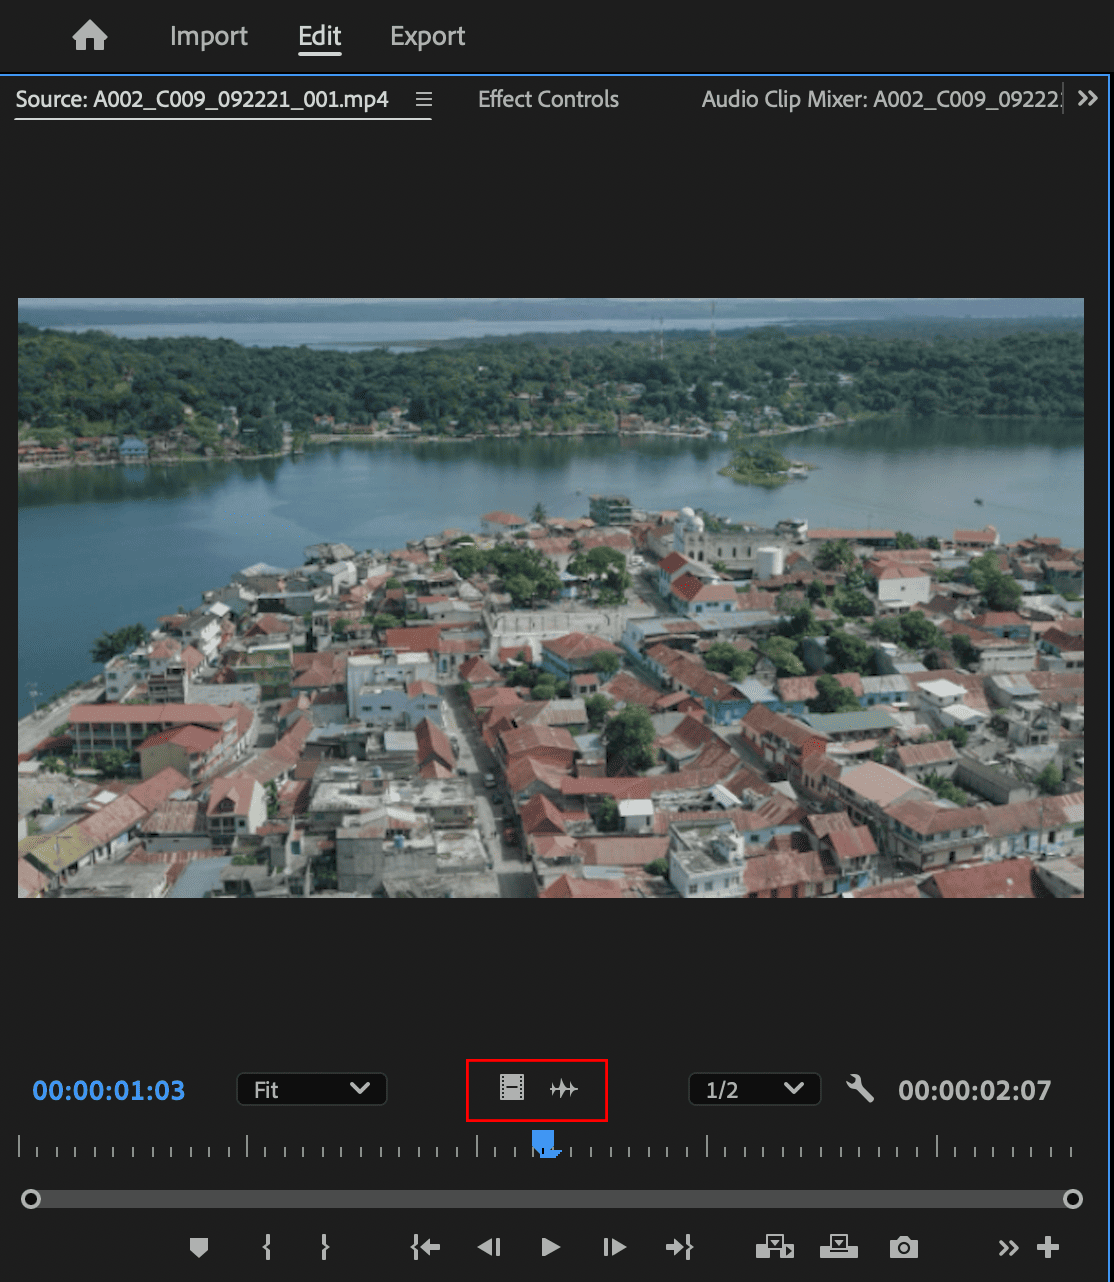
There are movie and audio icons at the bottom of the source monitor.
By dragging them individually to your timeline you can add a clip’s video or audio on its own.
Premiere Pro has so many ways to edit your sequence it will seem daunting at first.
Don’t worry though. Even as a complete beginner, there are some basic things you can do to make your sequence look great.
The basic editing tools can be seen just to the left on the timeline panel. For now, we are going to look at the 3 most commonly used tools.
The selection tool is the workhorse, it’s the default tool that does all the moving and arranging.
You can use the selection tool to position media in your timeline.
If you hover the selection tool over the front/back edge of any media in the timeline it will turn into a red arrow.
When you have the red arrow showing, you can drag the edge in or out to alter the length of that clip.
The razor tool is what lets you splice clips into multiple parts.
For example, if you have several clips and you want to jump back and forth between them you’d use the razor tool.
Just splice the clips wherever you want, then position the pieces wherever you want them on your timeline using the selection tool.
The slip tool is a rather clever thing but still easy for a beginner to use.
Let’s say you have trimmed the length of a clip using the selection tool and positioned it perfectly in your sequence.
Then you have a change of heart and want to use the last 30 seconds of the clip rather than the first 30 seconds.
You don’t want to start over and move your clip around when you have it just right.
Use the slip tool to click and drag the clip in question.
What you will be dragging is the clip’s individual timeline and not it’s physical position in your sequence.
Effectively, you’d be scrolling back or forward in time without changing its position in your sequence.
Bad audio can ruin a perfectly good video but you don’t need to be an audio pro to get it right.
The easy part is choosing perfect music that sets the right mood for your video, and you can find it in the AudioBuzz library.
Don’t forget to use our exclusive Video Preview Tool.
This video shows you how to easily make adjustments to your audio that will dramatically improve your work.
By this stage you can import your media, create a sequence and make some basic edits. great!
But you might feel like your video is still a little bland.
This is where you enter the wonderful world of video effects.
You don’t want to get too carried away and add so many that the viewer no longer knows what they are watching.
However, a few simple effects can make all the difference.
This video explains 5 must know effects for any video maker.
You are now ready to export your video.
This means taking all the media in your timeline and exporting it as one cohesive video.
Here, you will learn how to export your video and the best settings.
You won’t learn everything about Adobe Premiere Pro in one article.
There are just so many things that you can do with this fantastic video editing platform.
For a beginner, a solid grasp of the basics will go a very long way.
That’s what our Premiere Pro beginner’s guide is all about.
As you will soon find out, you can create stunning videos with just a few basic tools.
We have given you what we feel are the best foundations to build upon.
The things that will not only get some great results quickly but also help you on your way to becoming a pro!


| 00:00 / 00:00 | | $0 |